
1. Modeling for Real-Time 3D
The 3D viewer for browser draws your buildings in real-time, so to provide a smooth interactive user experience, your buildings should not be too complex. You can learn some techniques to optimize your buildings while retaining visual quality in this section.
Warning: Export early and often. In many cases, performance problems cannot be fixed, they require remodeling from scratch. It is therefore best to catch bad techniques early and fix them before they are used all over the scene.
Contents |
There are 3 main areas you will want to optimize when preparing data for real-time use:
- Downloading from server: Time taken to download the geometry and texture files from the server.
- Loading files to memory: Time taken to load files into memory for it to be rendered and viewed in the 3D viewer.
- Rendering the scene: Average time taken to render one frame of the scene. This affects the smoothness of your end-user’s experience.
You should try to optimize the 3 areas while still maintaining the visual quality of your model. Each pointer listed on this page works towards improving one or more of them, though sometimes, it’s at the expense of another area. Do what works best for your desired application.
2. Reduce the number of triangles
Generally, the higher the number of triangles in the scene, the slower it renders. We recommend that you do not go above 500,000 triangles for the entire scene for running your application on most modern computers.
Tip: If you intend to reuse and import models from other sources into your scene, only import models with a suitable level of detail in the current scene.
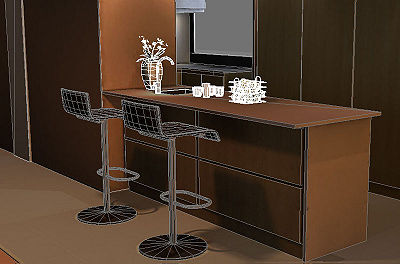
The accessories on the table top are very detailed, which would not be suitable if this was part of a large building scene.
Use textures for details
Use textures for details on your models instead of actual geometry. For example, structures such as grills, patterns, railings, text, buttons, etc. can use textures with alpha instead.

Different level of detail for handrails.
Tip: As a rule of thumb for full building scenes, protrusions and gaps shorter than 1 meter should probably be represented by textures.
Curved surfaces should be smoothed moderately
improves Downloading, Loading, Rendering
Curved surfaces should be smoothed sparingly, as smoothing increases the triangle count very quickly. The amount of smoothing should be proportional to the size of the feature. Change the normals of the surfaces to produce a smoothed appearance without adding triangles.
Optimize your planar features
Flat planar surfaces are easy to optimize, and you should use minimal number of triangles for the flat planar surfaces in your building models.
- Use double sided planes without thickness for thin planar objects like doors, glass panels
- Reduce unnecessary triangulation
Near planar surfaces, such as the seats in this example, can use a minimum number of triangles.
Include only what is visible
improves Downloading, Loading, Rendering
Include in your scene only the regions that will be visible in the application. For example, a building may have 30 levels, but only the bottom 3 levels are of interest in the application. In this case, only the bottom 3 levels should be completely modeled. The higher levels can simply be facades.
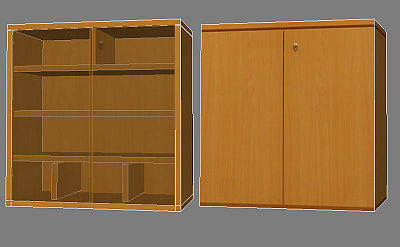
Parts which are not visible such as insides of cabinets should not be included.
Prioritize which objects in the scene to spend your triangles on
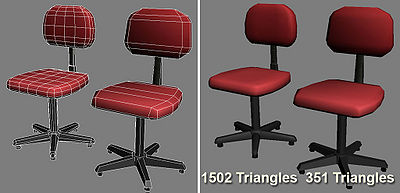
If you know what your building is going to be used for, optimize for it. For example, a complete 5-storey office building should have much simpler chair models than a condominium unit featuring highly detailed furniture. Less important areas, eg. staircase steps, can be simplified if you do not expect users to explore it.
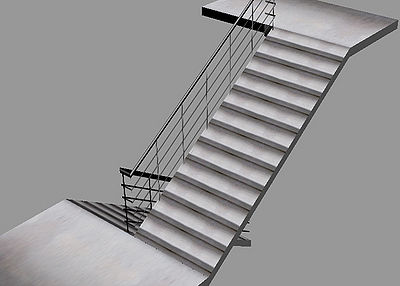
Staircase modeled as a textured ramp instead of actual steps
Use Lightmaps
Lightmaps can be use to add realism to the scene without too much overheads, and sometimes even reducing overheads. Some guidelines for using lightmaps:
- Lightmaps can usually be lower resolution than your diffuse textures.
- Lightmaps can have different texture coordinates from your diffuse textures. Eg. you can have a tiled diffuse texture with a lightmap for your ground.
- Lightmaps can usually be saved as greyscale images。
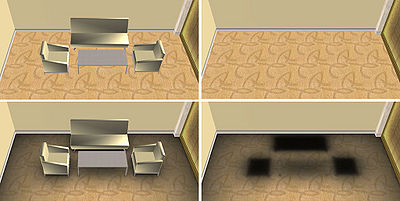
Above: Tiled floor texture.
Below: Tiled floor texture with lightmap.
Below: Tiled floor texture with lightmap.
附注: Different modeling applications may term lightmaps differently, eg. 3DS Max refers to them as Self-Illumination maps. Read your modeling application’s documentation to find out more.
3. Instance your geometry objects
There are usually many objects which are repeated in the scene, eg. doors, light fixtures, steps, etc. Many modeling packages allows you to create instances of an object, where any change made to an instance will be propagated to all the other instances of the object. Using instancing will help with both your modeling process and in real-time rendering use as well.
附注: Different modeling applications may term instancing differently, eg. 3DS Max calls them “Instances”, while Google SketchUp calls them “Components”. Read your modeling application’s documentation to find out more.
4. Reduce the size of textures
The dimensions of textures affect the processing speed of the textures. Keep the file size of the textures at a minimum. Larger textures simply mean longer load times and memory consumption.
Tip: The file size of the image file (in bytes) affects the download time of the file. The size of the image (in pixels) affects the loading and rendering time.
Use textures proportional to the area they cover
Use a smaller texture when the area it covers is small.
Use Power-of-Two dimensions
Provide your textures in Power-of-Two dimensions, ie. 1, 2, 4, 8, 16, 32, 64, 128, 256, 512, 1024, etc.. Otherwise, the loading process will be slower as it will resize the textures, since graphic cards ultimately process textures in Power-of-Two dimensions. The texture does not have to be a square, ie. 512×64 is fine.
Tip: Avoid having dimensions above 2048 as they are not commonly supported by graphics cards. Split up the texture file if you need high texture resolution in the area.
Tile your textures when possible
Tiling your textures will increase the pixel-to-area ratio, giving more details while reducing the size of the texture required, and also the number of unique textures used.
Tip: Tiling does not mean you need to give up details. Apply a coarse lightmap to the tiled surface to add shadows and break the tiled texture look.
Use greyscale PNGs for greyscale textures
improves Downloading, Rendering
If you have a texture which is greyscale (i.e. ‘black & white’), save it in an 8-bit greyscale PNG to reduce video memory usage to a quarter of a truecolor PNG or JPG’s memory usage. The file size will also be reduced moderately, which will speed up downloading.
附注: The PNG must be greyscale (up to 256 shades of grey) and not indexed (up to 256 colors). See below for some image editor examples.
- Using Adobe Photoshop CS
- • Open the image file.
- • Image > Mode > Grayscale
- • Image > Mode > 8 Bits/Channel
- • File > Save As... > PNG
- • Do not use File > Save for Web as that will save to indexed color, even if you choose PNG-8 + Grayscale.
- Using XnView
- • These instructions are for XnView 1.97.4
- • Open the image file.
- • If you are in XnView’s Browser view, double click the image to open it in its own tab.
- • Image > Convert to Grey > 256 Grey Scale
- • File > Save As... > PNG
How to check if a PNG is greyscale
- Using Adobe Photoshop CS
- • Open the image file.
- • Check that Image > Mode > Grayscale is checked
- • Check that Image > Mode > 8 Bits/Channel is checked
- Using XnView
- • These instructions are for XnView 1.97.4
- • Open the image file.
- • If the image is displayed in its own tab, switch to Browser view by pressing Enter.
- • Ensure that the Preview Pane is on by View > Preview Pane > Show。
- • Ensure that the Status Bar is on by View > Status Bar。
- • Check that the Status Bar lists “256 Grey Scale”.
5. Reduce the number of texture files
Having too many texture files is difficult to manage, and increases the processing overhead. Always try to minimize the number of texture file images for a scene.
Pack textures
Multiple small textures, for example sign boards, can be combined into a single large texture. You will need to adjust the texture coordinates accordingly when doing this.
附注: Packed textures cannot be tiled.
Multiple signs packed into a single texture


